Discover how to set up automatic email forwarding in Gmail to streamline communication and stay organized. Follow this easy guide for easy email management.
Managing multiple email accounts can be a time-consuming task, especially when important emails get lost in different inboxes. The constant need to switch between accounts can lead to missed messages and inefficiency.
This blog will show you how to set up automatic email forwarding in Gmail, helping you consolidate your messages into one inbox.
We’ll cover step-by-step instructions on forwarding emails from one Gmail account to another, or even to an external email address. Let’s jump in.
In a Nutshell: How to Auto Forward Emails in Gmail
Set Up Forwarding: Access Gmail settings and add a forwarding address to forward all or specific emails to another email account automatically.
Use Filters: Customize which emails get forwarded by creating filters based on sender, subject, or other criteria.
Choose Forwarding Options: Decide whether to keep, archive, or delete Gmail's copy of the forwarded emails.
Manage Settings: Regularly review your forwarding settings and filters to ensure everything stays organized and secure.
Security Measures: Ensure the destination email account is secure and consider using two-factor authentication to protect sensitive information.
What Is Automatic Email Forwarding?
While most people are familiar with manually forwarding individual emails, automatic email forwarding takes it a step further.
Instead of forwarding emails manually, automatic forwarding lets you set up a system where all incoming emails are sent to a different address automatically.
This feature is especially useful if you’re switching to a new email address or want to consolidate multiple email accounts into a single central inbox.
Now that we understand what automatic email forwarding is, let’s take a look at why it’s such a helpful feature.
Maximize the benefits of email forwarding with NewMail AI. Automate email sorting, prioritize key messages, and manage tasks seamlessly in one place, helping you stay organized and boost productivity. Start for free today!
Now that you know the advantages of forwarding emails, let’s go over the exact steps to set it up in Gmail.
Step-by-Step Guide to Setting Up Automatic Forwarding in Gmail
Gmail provides a straightforward method to automatically forward emails to another account, enabling you to consolidate all important messages in one place.
Below is a clear guide on how to set up automatic forwarding, along with tips for customizing it to meet your specific needs.
How Automatic Forwarding Works
Once you set up forwarding, Gmail sends a verification link to the email address you have set up for forwarding.
After verifying, your Gmail account will start forwarding new messages, except for spam, to the designated address.
You can also forward only specific types of messages by creating filters, offering a more tailored approach to managing your inbox.
Turning On Automatic Forwarding
Sign in to Gmail: Open the Gmail account you want to forward messages from.
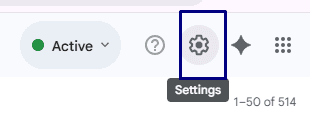
Open Settings: Click the gear icon in the top right corner and select See all settings.
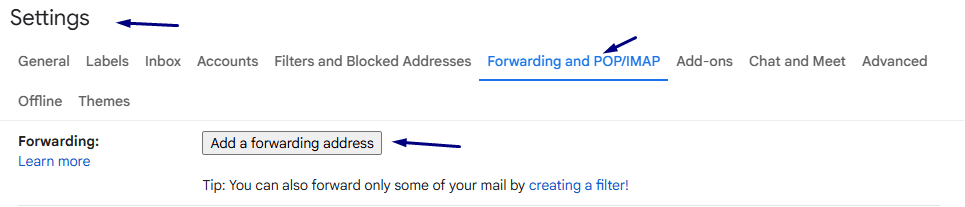
Go to the Forwarding Tab: Click on the Forwarding and POP/IMAP tab.
Add a Forwarding Address: In the "Forwarding" section, click Add a forwarding address, then enter the email address where you want to forward your messages.
Verify the Address: A verification message will be sent to the email address listed as the forwarding address. Click the verification link in that message.
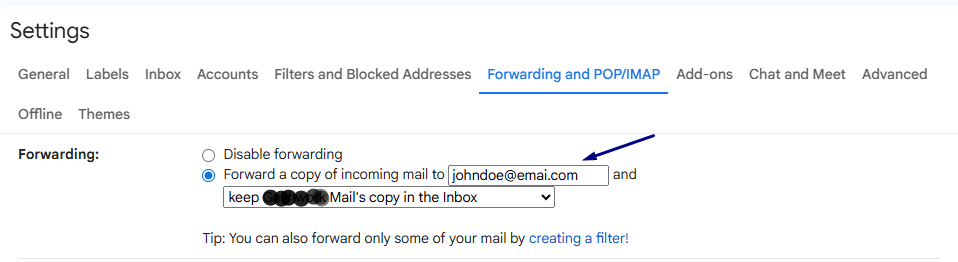
Set Forwarding Preferences: Return to your Gmail settings, refresh your browser, and in the Forwarding section, select Forward a copy of incoming mail to and choose the forwarding address.
Choose what happens to the copy: You can choose to keep Gmail's copy in the inbox, automatically archive the copy, or delete Gmail’s copy.
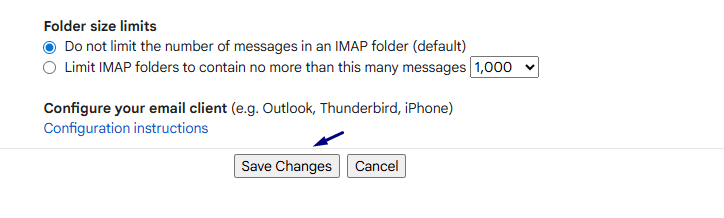
Save Changes: At the bottom of the page, click Save Changes.
Forwarding Specific Messages
By default, Gmail forwards all messages, but if you want to forward only specific types of emails, you can create filters.
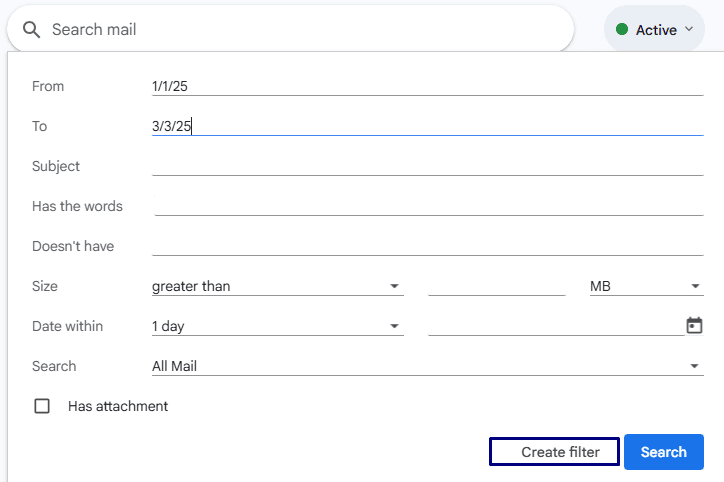
Create a Filter: In Gmail’s search bar, click the Show search options icon. Enter the search criteria, such as emails from specific senders or those with certain keywords in the subject.

Apply the Filter: Click Create filter, then select Forward it to and choose the forwarding address. Click Create filter to activate it.
If you need to forward emails to multiple accounts, create separate filters for each forwarding address.
Turning Off Automatic Forwarding
If you decide you no longer want to forward emails:
Open Gmail settings, go to Forwarding and POP/IMAP, and select Disable forwarding in the forwarding section.
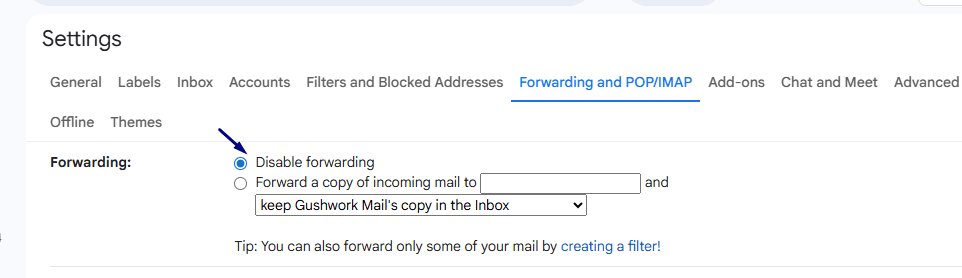
Don’t forget to click Save Changes.
Forwarding Notices
After setting up automatic forwarding, you’ll see some useful notifications to keep you informed.
1. Notice: "You are forwarding your email to [email address]"
If you have enabled automatic forwarding, you will see this reminder notice for the first week after forwarding is turned on. It’s a simple reminder that your emails are being forwarded, giving you a chance to review your settings.
2. Notice: "You are forwarding your email to [email address] and your filters are also forwarding some of your email."
If you’ve set up filters to forward specific messages, you’ll receive this notice for the first week after the filter is active. It serves as a reminder that the filter-based forwarding is also in effect.
3. What to Do if You See a Forwarding Notice but Didn’t Set It Up
If you notice a forwarding notification but didn’t set up forwarding yourself, it’s important to take action:
Change your password immediately. Someone else may have accessed your Gmail account. Learn how to change your password here.
From the Settings page in Gmail, turn off forwarding to stop any unauthorized forwarding.
By following these steps, you’ll reduce time spent switching between accounts, improve organization, and ensure that you never miss an important email.
Also Read: Why Am I Not Getting Emails? 10 Fixes That Actually Work
Once your forwarding is set up, it’s important to follow a few best practices to ensure everything runs smoothly and securely.
Benefits of Automatically Forwarding Emails
Automatically forwarding emails in Gmail can simplify your email management and boost productivity. Here are a few key benefits:
1. Streamlined Organization
Automatic forwarding consolidates emails from multiple accounts into one inbox, making it easier to stay organized and prioritize important messages without switching between accounts.
2. Efficient Email Filtering
Forwarding with filters allows you to automatically send spam or less relevant emails to the junk folder. This keeps your inbox clutter-free, ensuring you focus on high-priority tasks.
3. Quick Access to Important Emails
With all your emails in one place, you can easily access important messages and attachments, regardless of the account they originated from. This saves time and keeps you connected.
4. Increased Productivity
By consolidating your inboxes, you spend less time checking multiple accounts and more time on tasks that matter, making your workflow more efficient.
5. Enhanced Control
Forwarding allows you to decide which emails land in your primary inbox, giving you better control over what you see and ensuring you don’t miss essential messages.
Automatic forwarding streamlines your email management, helping you stay organized, save time, and focus on what’s truly important.
Best Practices for Automatic Email Forwarding in Gmail
When setting up email forwarding, it’s essential to approach the process thoughtfully to ensure maximum efficiency and security. Here are some best practices to keep in mind:
1. Prioritize Security
When forwarding emails to an external account, make sure the destination email address is secure and trusted. Avoid forwarding sensitive or confidential information to less secure accounts, as this could potentially expose you to security risks.
Consider using two-factor authentication (2FA) on both your primary and forwarding email accounts to enhance security.
Boost your email security with NewMail AI. With robust encryption, secure data handling, and privacy-focused features, you can manage your emails and tasks with peace of mind knowing your information is secure.
2. Organize with Filters
Filters help you automatically categorize and prioritize emails before they even hit your inbox.
For instance, you can forward emails from specific senders or with certain keywords directly into designated folders, making it easier to track important communications.
3. Regularly Review Your Settings
Your needs and priorities may change over time, so it's important to review your forwarding settings and filters regularly.
Regular reviews ensure that your forwarding settings continue to serve your current workflow and reduce the risk of missing important messages.
4. Set Clear Expectations for Forwarded Emails
If you're forwarding emails from a professional account to a personal one, make sure you're clear about your boundaries.
You may want to set up a system that only forwards high-priority emails, leaving routine messages behind. This helps you avoid feeling overwhelmed by a flood of forwarded emails.
5. Use Forwarding for Temporary Situations
If you only need to forward emails temporarily, such as during travel or while you're out of the office, be sure to turn off forwarding as soon as it’s no longer necessary. Keeping forwarding enabled for longer than needed could result in clutter or missed emails.
6. Manage Your Outbox Efficiently
Forwarding emails often comes with the potential for reply-all chains or unintentional inbox clutter.
Consider disabling replies to forwarded emails, especially in a professional context, to prevent excessive notifications or distractions. This keeps your inbox cleaner and more manageable.
Streamline your inbox with NewMail AI. Effortlessly manage email responses, reduce clutter, and stay focused on what matters most with smart email organization and task management features.
7. Utilize Forwarding for Team Collaboration
Instead of manually sharing individual emails, set up forwarding rules to send specific communications to team members automatically.
This can save you time and ensure everyone is on the same page without needing to forward each email individually.
8. Backup Important Emails
If you're forwarding critical emails to a secondary account, it’s important to back them up. Gmail and other platforms offer ways to archive or save these messages for future reference. This ensures that nothing gets lost in the transition and you always have access to your essential communications.
By following these best practices, you can set up email forwarding in a way that enhances your productivity while maintaining control over your communications.
Also Read: Gmail Tips and Tricks for Boosting Productivity 2025
Conclusion
Setting up automatic email forwarding in Gmail can greatly simplify your email management, helping you stay organized and reduce the risk of missing important messages.
You can forward all or specific emails to a central inbox, apply filters for better organization, and customize your settings to fit your needs by following the steps outlined in this blog.
If you’re looking to take your email management a step further, NewMail AI offers powerful features that go beyond forwarding:
Smart Email Organization: Automatically sorts and prioritizes emails based on your preferences, ensuring you focus on what matters most.
Customizable Filters: Set rules for automatic email handling, ensuring you never miss an important message.
Email Drafting: Create quick and accurate email responses with context-based suggestions, saving you time.
Integrated Calendar Management: Seamlessly manage meetings and appointments within your inbox, without the need for switching apps.
Task Management: Automatically convert emails into tasks so that you can stay on top of follow-ups and deadlines.
Ready to simplify your workflow? Try NewMail AI today and experience how easy email management can be!