While auto-labeling seems straightforward, results depend heavily on how filters are configured. This guide covers the exact steps to set up Gmail's automatic labeling, the filter parameters that matter most, and common mistakes that cause labels to misfire or be ignored entirely.
Key Takeaways
- Gmail labels emails automatically by pairing Labels with Filters—tags you create, rules that apply them
- Setup takes under 5 minutes using Gmail's built-in search/filter builder—no third-party tools needed
- Filter accuracy depends on your criteria: sender, subject keywords, body text, or attachments
- Labels don't move emails out of your inbox by default; add "Skip the Inbox" to auto-archive them
- AI-powered tools can automate categorization without manual rule-building for complex inboxes
What Are Gmail Labels (and How Are They Different from Folders)?
Gmail labels act as colored, clickable tags attached to emails. Unlike traditional folders, a single email can have multiple labels applied simultaneously, making them more flexible for categorizing by project, sender, priority, or status.
Applying a label does not move the email out of your inbox — it only tags it. Labeled emails stay visible in both the main inbox and under the label in the sidebar. This is the core difference from folders, where an email lives in one location only.
Labels also support a few features that make them more powerful than basic folder systems:
- Create parent/child hierarchies (e.g., "Finance" → "Invoices") for nested organization
- Apply up to 100 custom color combinations for quick visual scanning
- Use labels as filter triggers to automate actions like archiving or forwarding
How to Automatically Label Emails in Gmail
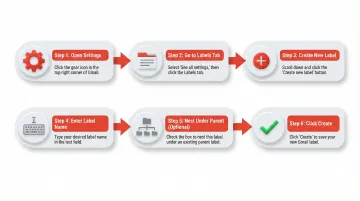
Step 1: Create Your Gmail Label First
Create a label before building your filter using one of three methods:
Primary method (via Settings):
- Click Settings (gear icon) → See all settings
- Navigate to the Labels tab
- Scroll to Labels section → Click "Create new label"
- Enter a descriptive name (e.g., "Client: Acme Corp" or "Invoices")
- Optionally check "Nest label under" to create a sub-label under an existing parent label
- Click Create
Alternative methods:
- Click the "+" icon next to "Labels" in the left sidebar
- From an open email, click the label icon in the toolbar
Nested labels let you build a structured filing system before setting up filters. For example, nest "Invoices" and "Receipts" under a parent "Finance" label to keep related emails grouped in one place.
Step 2: Open Gmail's Filter Builder
Access the filter builder using either method:
Primary method:
- Click the search bar at the top of Gmail
- Click the "Show search options" icon (three horizontal sliders) on the right side of the search bar
- This opens the advanced search panel where you'll define filter criteria
Quick method from existing email:
- Select an email you want to filter
- Click "More" (three vertical dots) → "Filter messages like these"
- Gmail pre-populates the "From" field with the sender's address
With your filter builder open, the next step is choosing which emails it should catch.
Step 3: Define Your Filter Criteria
The filter builder provides several criteria fields:
Available filter fields:
- From - Sender email address or domain
- To - Recipient address (your email or alias)
- Subject - Exact phrase or keyword in subject line
- Has the words - Keyword search in email body
- Doesn't have - Exclude emails containing specific terms
- Has attachment - Checkbox to filter only emails with attachments
- Size - Filter by email size
Best practice: Click "Search" before creating the filter to preview which emails match your criteria. This prevents creating filters that capture unintended emails or miss intended ones.
Combining criteria for precision: Gmail uses AND logic when multiple fields are filled. For example, filtering emails "From: newsletter@company.com" AND "Has attachment" separates invoices from general updates from the same sender.
Exact-match vs. partial criteria:
billing@vendor.comcatches only that one sender@vendor.comcatches every email from that company- Use domain-level filtering only when all emails from that domain belong in the same label
Step 4: Apply the Label and Finalize the Filter
After clicking "Create filter" at the bottom of the search panel:
Action options window:
- Check "Apply the label"
- Select your label from the dropdown (or create a new one inline)
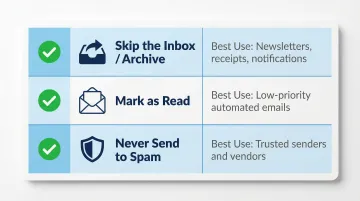
Recommended additional actions:
- Skip the Inbox (Archive it) — keeps labeled emails out of your primary inbox
- Mark as read — useful for low-priority automated emails
- Never send to Spam — ensures trusted senders aren't filtered incorrectly
"Also apply filter to matching conversations" checkbox: Checking this applies the filter to emails already in your inbox, not just future ones. Before enabling it with a broad filter, run the preview search first — a domain-level filter can match far more existing emails than expected.
Key Filter Parameters That Determine Label Accuracy
The same five-step process produces very different results depending on filter criteria configuration. The goal is to build filters precise enough to catch all intended emails without mislabeling unrelated ones.
Sender/Domain Specificity
Two approaches exist for sender-based filtering, each with different precision levels:
- Full email address (for example, billing@vendor.com) — targets exactly one sender, the most reliable option
- Domain filtering (@vendor.com) — captures all mail from a company, but over-captures if that domain sends newsletters, invoices, and support tickets to the same inbox
Use domain filters only when every email from that sender belongs under the same label. Otherwise, combine domain filtering with additional criteria.
Subject Line Keywords
Subject-line keywords (for example, "Invoice," "Receipt," "Follow-up") work well for recurring email types with predictable subjects. Single common words like "update" or "meeting" will over-capture and mislabel unrelated emails.
Test the search first: Click "Search" to preview results before creating the filter. If the preview shows irrelevant emails, add more specific criteria.
"Has the Words" Body Search
This field searches email body content — useful for catching emails without consistent subject patterns. It works best for highly distinctive phrases (for example, "your order has shipped") rather than common words.
Body search is slower and prone to false positives. Use it only when sender and subject filtering aren't sufficient.
Combining Criteria with AND Logic
Using multiple fields simultaneously creates an AND condition (for example, From: @amazon.com AND Subject: "Your order"). This dramatically improves accuracy.
Practical example (invoicing filter):
- From: billing@vendor.com
- Subject: Invoice
- Has attachment: Checked
This filter catches only invoice emails with attachments from the billing department, excluding general updates or marketing emails.
Common Mistakes When Setting Up Gmail Auto-Labels
Using Overly Broad Filter Criteria
The most common mistake is filtering by a single generic keyword (e.g., "project") or a broad domain that also sends newsletters and notifications. The result is a label filled with irrelevant emails that undermines the system's usefulness.
How to fix it: Preview search results before saving the filter. If unrelated emails appear, add more specific criteria or combine multiple fields.
Forgetting That Labels Don't Move Emails
Many users expect applying a label to remove emails from the primary inbox (like a folder would). When it doesn't, the inbox still feels cluttered.
How to fix it: Pair the "Apply the label" action with "Skip the Inbox" in the same filter for emails that don't need to surface in your inbox — newsletters, automated receipts, and notifications are good candidates.
Not Applying Filters Retroactively When Needed
When a new filter is created, it only affects future emails by default. Users who set up auto-labels to organize an existing backlog often discover hundreds of past emails remain unlabeled.
How to fix it: Two options here:
- Check "Also apply filter to matching conversations" when creating the filter
- Select existing emails in bulk (checkbox → Actions → Apply label) to retroactively label your backlog
When Gmail's Auto-Labels Aren't Enough
Gmail's filter-based labeling works well for predictable, rule-based email patterns—specific senders, consistent subject lines, or recurring keywords. But it breaks down when email content is varied, senders change frequently, subjects are inconsistent, or when you need to categorize emails by intent or urgency rather than metadata.
The Limits of Filter Rules
Google officially allows up to 5,000 labels per account, but Google Workspace Admin documentation recommends using 500 labels or fewer to prevent account performance degradation. Complex inboxes—executives, sales reps, support teams—quickly hit scenarios where dozens of rules still can't fully categorize incoming mail.
Emails from new clients, one-off project threads, and conversational exchanges with shifting subject lines all fall through. Research on long-term email networks shows 63% of emails have a lifetime of 5 days or less—meaning static rules based on specific senders or subjects go stale fast.
Filter rules also require constant updates as workflows evolve. The more complex your inbox, the more maintenance the system demands.
A Context-Aware Alternative
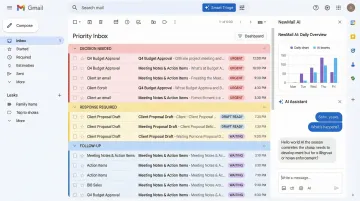
When rules can't keep up, the underlying problem is that Gmail filters match metadata—not meaning. NewMail AI takes a different approach: it categorizes emails using context understanding and intent detection rather than keyword matching. Instead of writing filter rules, you get a priority inbox with custom categories that adapt to your communication patterns automatically.
Here's what that looks like in practice:
- Analyzes full email threads by semantic content and relationship—not just subject lines
- Classifies emails by what needs to happen next: decision, response, scheduling, or follow-up
- Groups emails into workflow stages (pending, stalled, active, completed) automatically
- Requires zero setup and adapts as your communication patterns change
- Processes data in-memory and discards it immediately—no email content is ever stored
NewMail AI works directly inside Gmail, integrates in under 2 minutes, and is Google Security Certified with zero data retention by default. A 14-day free trial with full access (no credit card required) lets you test AI-powered categorization without manual rule-building.
Frequently Asked Questions
How do I create a filter in Gmail to automatically apply a label to incoming emails?
Open Gmail's search bar → click the filter icon (three sliders) → enter criteria (sender, subject, keywords) → click "Create filter" → check "Apply the label" → select your label → click "Create filter" to confirm. The filter applies automatically to all future matching emails.
Can Gmail automatically label emails?
Yes. Set up a filter with your criteria (sender, subject, keywords), assign a label, and Gmail handles the rest automatically. To label existing emails at the same time, check "Also apply filter to matching conversations" when saving the filter.
How do I organize thousands of emails in Gmail?
Start by building a label structure (by project, sender, or status), then create filters to categorize new emails automatically. Use "Also apply to matching conversations" to retroactively label existing emails in bulk — pairing labels with "Skip the Inbox" keeps your primary inbox focused on what needs attention.
How do I stop Gmail from separating emails?
Gmail separates emails via tabs (Primary, Social, Promotions) or conversation threading. To disable tabs: Settings → See all settings → Inbox type → select "Default" and uncheck tab categories. To keep related emails together, ensure conversation view is turned on in Settings → General.