Introduction
Scheduling meetings in today's workplace is more complex than simply picking a time slot. Many professionals struggle with checking multiple calendars, coordinating across time zones, and avoiding double-bookings — all while trying to minimize email back-and-forth. According to a 2024 State of Meetings report by Calendly, 43% of workers spend three or more hours per week just scheduling and rescheduling meetings.
Outlook's calendar tools appear straightforward, but what you can actually do depends on several variables: which scheduling method you use (Scheduling Assistant vs. Scheduling Poll), your Microsoft 365 subscription tier, and whether attendees are inside or outside your organization. Miss these distinctions and you'll create invites without checking availability — then spend the next hour managing a flood of "I can't make it" replies.
This guide covers:
- Exact steps to schedule meetings and check availability in Outlook
- Account prerequisites you need before you start
- Key factors that affect what availability data you can see
- Common mistakes that waste time
Key Takeaways
- Scheduling Assistant shows a real-time free/busy grid for internal attendees before you send an invite
- Use Scheduling Poll for external guests or large groups — attendees vote on preferred times via a secure link
- Microsoft 365 Business or Enterprise is required for Scheduling Assistant; personal Outlook.com accounts don't support free/busy data
- AutoPick and Room Finder automatically find open slots and reserve conference rooms
- Most scheduling errors come from ignoring Required vs. Optional attendees, missing time zones, and skipping availability checks
How to Schedule a Meeting in Outlook and Check Availability
This method uses Outlook's Scheduling Assistant to visually confirm attendee availability before sending the invite. It works across New Outlook, Classic Outlook, and Outlook on the Web.
Step 1: Open a New Meeting
Navigate to the Calendar view by clicking the Calendar icon in the left sidebar, then select "New Event" (in New Outlook) or "New Meeting" (in Classic Outlook for Windows). For faster access, use the keyboard shortcut Ctrl+Shift+Q.
This creates a meeting request, not a personal appointment. Meeting requests send invitations and track RSVPs, while appointments are calendar blocks for yourself only — so only meeting requests notify your attendees.
Step 2: Add Attendees and Assign Roles
In the Invite Attendees field, type names or email addresses. Outlook will auto-suggest contacts based on your recent email and meeting history, and you can also pull attendees from your Address Book.
How you assign roles affects scheduling logic:
- Required attendees must be free for AutoPick to suggest a time
- Optional attendees are informed but don't block available slots
- Only 12.6% of meeting invitees are marked as optional, yet many stakeholders could be, which creates unnecessary scheduling friction
Step 3: Open the Scheduling Assistant
Click the "Scheduling Assistant" tab in the ribbon (or the button near the date/time field on Mac). The grid layout shows:
- Each row = one attendee
- Each column = a time block (typically 30-minute increments)
- Color-coded blocks = availability status
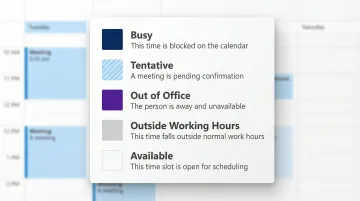
What the colors mean:
- Dark blue: Busy
- Light blue with hashing: Tentative
- Purple: Out of Office
- Light gray: Outside working hours
- Blank/Clear: Available
Step 4: Select a Time Slot and Finalize
Click a clear column to select it, then drag the frame edges to adjust the meeting duration in 30-minute increments. In Classic Outlook, the AutoPick button automatically advances to the next open slot where all required attendees are free.
After selecting a time, return to the Event or Meeting view and complete the details before sending:
- Title: A clear subject line attendees will recognize
- Location: Physical address, Teams link, or a conference room via Room Finder
- Attachments: Any agenda files or pre-read materials
Click Send when ready.
How to Use Scheduling Poll for External Attendees or Large Groups
Scheduling Assistant only shows availability for people within your organization. External contacts always appear as "Unknown," and for large groups, the grid becomes difficult to read. Scheduling Poll solves both problems by allowing external participants to vote on times without needing a Microsoft 365 account.
Step 1: Start a New Email and Insert a Scheduling Poll
Compose a new email to your attendees (or reply to an existing thread), then insert a Scheduling Poll:
- Outlook Web: Insert tab → Scheduling Poll
- Outlook for Windows: Messages tab → Scheduling Poll
- Mac: Three-dots menu → Scheduling Poll
Note that Classic Outlook and mobile apps do not support creating Scheduling Polls natively, though mobile users can vote via the web link.
Step 2: Choose Time Slots and Configure Poll Settings
In the Scheduling Poll panel, select multiple time slot options. Internal attendees show color-coded availability (green = available, purple = tentative, red = busy), while external attendees always appear red regardless of their actual schedule.
Use that color feedback to identify times that already work for your internal team — then propose only those slots to external participants.
Key poll settings:
- Schedule when attendees reach consensus — Outlook auto-books the meeting once all required attendees select the same slot; if times tie, the earliest wins
- Hold selected times on my calendar — adds tentative blocks for each proposed slot, which clear automatically once the meeting is confirmed or canceled
- Require attendees to verify their identity — adds an authentication step before voting to prevent anonymous or spoofed responses
Step 3: Send and Manage the Poll
Click "Create Poll," which inserts a voting widget into the email body, then click Send. All attendees — including external ones — receive a link to vote on their preferred time without needing to sign in to Microsoft 365.
Once votes are collected, click "Schedule Meeting" to confirm the winning time. Outlook then sends calendar invites to all attendees and clears the tentative holds from your calendar.
What You Need Before Scheduling a Meeting in Outlook
Before you start, it's worth knowing which tools you'll actually have access to. The scheduling features available depend on your Microsoft 365 subscription, account type, and how your organization has configured calendar sharing.
Scheduling Assistant requirements:
- A Microsoft 365 Business or Enterprise plan (Business Basic, Business Standard, Business Premium, E3, or E5) with Exchange Online
- Works only for attendees within the same organization or Exchange environment
- Not available for personal Microsoft accounts (Outlook.com or Hotmail)
Calendar visibility depends on how your colleagues have configured their sharing settings — which affects whether you'll see full schedules or just free/busy blocks.
Attendee calendar visibility:
- Attendees must have their calendars shared or set to show free/busy information within the organization
- If a colleague's calendar is private or they're external, their availability will display as "Unknown" in the grid
Scheduling Poll availability:
- Supported in New Outlook for Windows, Outlook Web, and Teams for Web
- Not supported in Classic Outlook or mobile apps for poll creation (though mobile users can vote via web link)
Key Factors That Affect Availability Visibility in Outlook
The quality of availability data you see in Scheduling Assistant depends on several variables — knowing which ones apply to your situation prevents misreads before they happen.
Internal vs. External Attendees
Internal attendees with active Microsoft 365 or Exchange accounts display live free/busy data. External contacts always show as "Unknown" — their slot may appear clear but could be fully booked. This is why Scheduling Poll exists for cross-organization meetings.
Calendar Sharing and Privacy Settings
"Unknown" status for internal colleagues usually comes down to one of two settings:
- The attendee has set their calendar to private or restricted sharing
- Your IT admin has applied organization-wide policies that limit visibility
Time Zone Configuration
Free/busy times render based on the organizer's time zone settings. When scheduling across time zones, confirm the correct time zone is selected in the meeting creation window to avoid off-by-one-hour errors.
This is increasingly worth checking: 30% of all meetings now span multiple time zones, up 35% since 2021, and each additional hour of time zone separation reduces synchronous communication by 11%.
Common Mistakes When Scheduling Meetings in Outlook
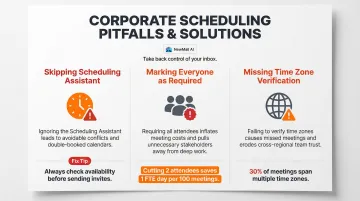
Three habits account for most scheduling friction in Outlook. Catching them early saves more time than any calendar trick.
- Skipping the Scheduling Assistant: Most "I can't make it" replies are avoidable. Checking the free/busy grid before sending takes 30 seconds and eliminates the back-and-forth of rescheduling entirely.
- Marking everyone as Required: AutoPick and Scheduling Poll both prioritize Required attendees when finding open slots. Listing stakeholders who are informed but not decision-makers as Optional opens up far more viable times. Cutting just two unnecessary attendees from a 30-minute meeting saves the equivalent of one full FTE day per 100 meetings.
- Missing time zone verification: An invite sent in the wrong time zone shows up at the wrong local time for remote attendees — and they may not notice until it's too late. With late-evening meetings rising 16% year-over-year due to cross-timezone collaboration, a single field left unchecked adds real strain to already stretched schedules.
Scheduling is only half the equation. For teams running back-to-back calls, NewMail AI handles the other half — automatically extracting action items and delivering instant meeting recaps so nothing falls through after the call ends.
Frequently Asked Questions
What is the difference between creating an appointment and a meeting in Outlook calendar?
An appointment is a calendar block for yourself only — no invites are sent. A meeting involves inviting other attendees, and Outlook sends email invitations and tracks RSVPs. Use appointments for personal time blocks and meetings when others need to be notified.
Can I update a meeting invite in Outlook without notifying all attendees?
In New Outlook, when you click "Send Update," you can choose to notify only added or removed attendees rather than all attendees. This keeps minor changes — like agenda updates or location edits — from triggering inbox noise for the full group.
Does Scheduling Assistant show availability for people outside my organization?
Scheduling Assistant only displays free/busy data for attendees within the same Microsoft 365 or Exchange organization. External contacts always appear as "Unknown," so use Scheduling Poll instead for cross-organization meetings.
How do I set up a recurring meeting in Outlook?
After completing meeting details, click the Recurring icon, choose a pattern (daily, weekly, monthly, etc.), set an end date, and click Send — the tab updates to "Meeting Series" to confirm the recurrence is set.
What does the AutoPick button do in the Outlook Scheduling Assistant?
AutoPick (available in Classic Outlook for Windows) automatically advances the proposed meeting time to the next available slot when all required attendees are free, eliminating the need to manually scan the availability grid for open windows.
Can I schedule a meeting in Outlook on my phone?
The Outlook mobile app for Android and iOS supports meeting scheduling and includes a simplified availability view where green means everyone is free and red indicates a conflict. Scheduling Poll creation is not supported in the app, however.